SET-XP®High-Strength EPOXY Anchoring Adhesive for Cracked and Uncracked Concrete,SIMSET-XP10
|
|
MSRP: $38.00
$22.00
You Save: $16.00 (42 %)

Manufacturer: Simpson Strong-Tie Anchors
Manufacturer Part No: SET-XP10
PHTS Number: SIMSET-XP10
* Whole number only
|
USES
When SET-XP® adhesive is used with all threaded rod or rebar, the system can be used in tension and seismic zones where there is a risk of cracks occurring that pass through the anchor location. It is also suitable for uncracked concrete conditions.
APPLICATION
Surfaces to receive epoxy must be clean. The base-material temperature must be 50º F or above at the time of installation. For best results, material should be 70–80º F at the time of application. Cartridges should not be immersed in water to facilitate warming. To warm cold material, the cartridges should be stored in a warm, uniformly-heated area or storage container for a sufficient time to allow epoxy to warm completely. Mixed material in nozzle can harden in 5–7 minutes at a temperature of 40º F or above.
SUGGESTED SPECIFICATION
Anchoring adhesive shall be a two-component high-solids, epoxy-based system supplied in manufacturer's standard cartridge and dispensed through a staticmixing nozzle supplied by the manufacturer. The adhesive anchor shall have been tested and qualified for performance in cracked and uncracked concrete per ICC-ES AC308. Adhesive shall be SET-XP® adhesive from Simpson Strong-Tie, Pleasanton, CA. Anchors shall be installed per Simpson Strong-Tie instructions for SET-XP epoxy adhesive.
SHELF LIFE
24 months from date of manufacture in unopened sideby-side cartridge.
STORAGE CONDITIONS
For best results, store between 45–90° F. To store partially used cartridges, leave hardened nozzle in place. To re-use, attach new nozzle.
COLOR
Resin – white, hardener – black-green. When properly mixed, SET-XP adhesive will be a uniform teal color.
CLEAN UP
Uncured material – Wipe up with cotton cloths. If desired, scrub area with abrasive, waterbased cleaner and flush with water. If approved, solvents such as ketones (MEK, acetone, etc.), lacquer thinner or adhesive remover can be used. DO NOT USE SOLVENTS TO CLEAN ADHESIVE FROM SKIN. Take appropriate precautions when handling flammable solvents. Solvents may damage surfaces to which they are applied. Cured Material – chip or grind off surface.
CHEMICAL RESISTANCE
Very good to excellent against distilled water, in-organic acids and alkalis. Fair to good against organic acids and alkalis, and many organic solvents. Poor against ketones.
Cure Schedule
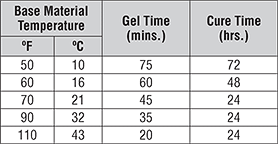
For water-saturated concrete, the cure times are doubled.
1. HOLE PREPARATION: Horizontal, Vertical and Overhead Applications

1. Drill –
Drill hole to specified diameter and depth.
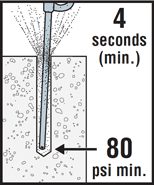
2. Blow –
Remove dust from hole with oil-free compressed air for a minimum of 4 seconds. Compressed air nozzle must reach the bottom of the hole.
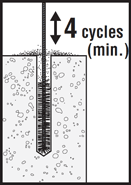
3. Brush –
Clean with a nylon brush for a minimum of 4 cycles. Brush should provide resistance to insertion. If no resistance is felt, the brush is worn and must be replaced.
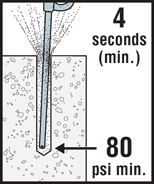
4. Blow –
Remove dust from hole with oil-free compressed air for a minimum of 4 seconds. Compressed air nozzle must reach the bottom of the hole.
1. Check –
Check expiration date on product label. Do not use expired product.Product is usable until end of printed expiration month.
2. Open –
Open cartridge per package instructions.
 Note: Note: For bulk dispensing, check pail or drum label for detailed mixing and preparation instructions.
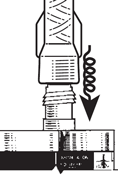
3. Attach – Attach proper Simpson Strong-Tie® nozzle to cartridge. Do not modify nozzle.

4. Insert – Insert cartridge into dispensing tool.

5. Dispense – Dispense adhesive to the side until properly mixed (uniform color).
3. FILLING THE HOLE: Vertical Anchorage
Prepare the hole per instructions "Hole Preparation".
Note: Nozzle extensions may be needed for deep holes.
1. Fill –
Fill hole 1/2 - 2/3 full, starting from bottom of hole to prevent air pockets. Withdraw nozzle as hole fills up.

Threaded rod or rebar
2. Insert –Insert clean, oil free anchor, turning slowly until the anchor contacts the bottom of the hole.
3. Do not disturb – Do not disturb anchor until fully cured. (See cure schedule for specific adhesive.)
1. Fill –
Fill holecompletely full, starting from bottom of hole to prevent water pockets. Withdraw nozzle as hole fills up.

Threaded rod or rebar
2. Insert –Insert clean, oil-free anchor, turning slowly until the anchor contacts the bottom of the hole.
3. Do not disturb – Do not disturb anchor until fully cured. (See cure schedule for specific adhesive.)
FILLING THE HOLE: Horizontal and Overhead Anchorage
Prepare the hole per instructions "Hole Preparation".
Note: Nozzle extensions may be needed for deep holes.

1. Install – Install Simpson Strong-Tie® ARC adhesive retaining cap. Refer toAdhesive Retaning Caps for proper ARC size.

2. Fill – Fill hole 1/2 - 2/3 full, starting from bottom of hole to prevent air pockets. Withdraw nozzle as hole fills up.

Threaded rod or rebar
3. Insert – Insert clean, oil-free anchor, turning slowly until the anchor contacts the bottom of the hole.

Threaded rod or rebar
4. Do not disturb – Do not disturb anchor until fully cured. (See cure schedule for specific adhesive.)
FILLING THE HOLE: When Anchoring with Screens: For AT, ET-HP, and SET Adhesives (except SET1.7KT)
Prepare the hole per instructions "Hole Preparation".

1. Fill – Fill screen completely. Fill from the bottom of the screen and withdraw the nozzle as the screen fills to prevent air pockets. (Opti-Mesh® screens: Close integral cap after filling.)

2. Insert – Insert adhesive filled screen into hole.

3. Insert – Insert clean, oil free anchor, turning slowly until the anchor contacts the bottom of the screen.

4. Do not disturb – Do not disturb anchor until fully cured. (See cure schedule for specific adhesive.)
|
|